Building Alignment into Designs
Posted: April 1, 2013 Filed under: Education, Embrilliance Software, Embroidery Software, Projects 3 Comments Today I’m going to talk about lining up designs at the embroidery machine. A few people have asked “I only have a 4×4 hoop, so how can I stitch out names using bigger letters?” I think this has come up as a question to me because of the new AlphaTricks feature pack that was released in March 2013. If you haven’t seen this SLICK software – works on either Mac or PC – you should check it out at http://www.Embrilliance.com For anyone that has purchased alphabet designs in the past or future, this program really makes using them easy as pie.
So I thought I would post a mini lesson using Embrilliance Essentials and some designs that I have created to show how easy it can be to line up designs. This is NOT about splitting large designs into smaller sections! This is how to combine designs in software – like a long name for example – and make sure that when you get to the machine, you can stitch them out all nice and lined up. YES, this could also be applied to lining up pieces of a design that has been split into smaller sections but the focus of this blog post is how I build alignment into designs that will be stitched out.
And the reason I provide the designs is so that if you are interested, you can actually follow along with the instructions to do exactly what I do. I recommend actually stitching out the combined design if you have never rehooped before. For best results use some sort of woven fabric, not a looped towel, felt or quilted fabric. I would recommend for this practice that you use a piece of cotton that is about 8″ x 16″. Sure that is WAY bigger than the design, but we don’t want the size of the fabric getting in the way of learning the technique!
First, here is the link to download the zipped file containing the designs we will be using:
Next, here is the link to the how to video on my SewBubbles YouTube channel:
How to Create Alignment in Embroidery Designs
Now at the end of this video, I talk about stitching out the design at the machine. Wouldn’t it be nice if I showed you pictures of this process? So that you can continue to work along with me? I thought so too, so here we go.
First we need to hoop the LEFT side of the fabric rectangle since we are stitching the left side of the design. Load the first design to the machine, the one we named leftside.pes.

Stitch the entire design, including the last color which is the alignment line. If you remove any stabilizer at this time be careful not to rip out the stitches of the alignment line. If you do, you no longer have the alignment built into the design.
You have just stitched the first design with the alignment line — you are halfway done! Breathe — it is not hard!
Hoop adhesive stabilizer – I like to use Floriani Wet N Gone Tacky or Sulky Sticky Fabri-Solvy because you just wash it away when the project is done. In this photograph I used Floriani Perfect Stick for photography purposes – so you could see the holes in the stabilizer.

Load the second design to the machine – rightside.pes – and attach the hoop to the machine and stitch Color #1, the alignment line, into the stabilizer and take the hoop off the machine and place on flat surface. If your thread comes out, no problem! You just need the holes in the stabilizer! If you really want the line of thread, before you attach the hoop to the machine for the second hooping, pull the bobbin thread up from the bobbin – if you had an older sewing machine, you had to do this or you got thread nests! If you’ve never experienced this, hold onto the tail of the top thread and turn the hand wheel towards you one revolution. When the needle comes back up, it should have pulled the bobbin thread tail up – grab this and pull out a couple inches. Now put the hoop at the machine. But, like I said, in the stabilizer you just need holes, so do not fret!
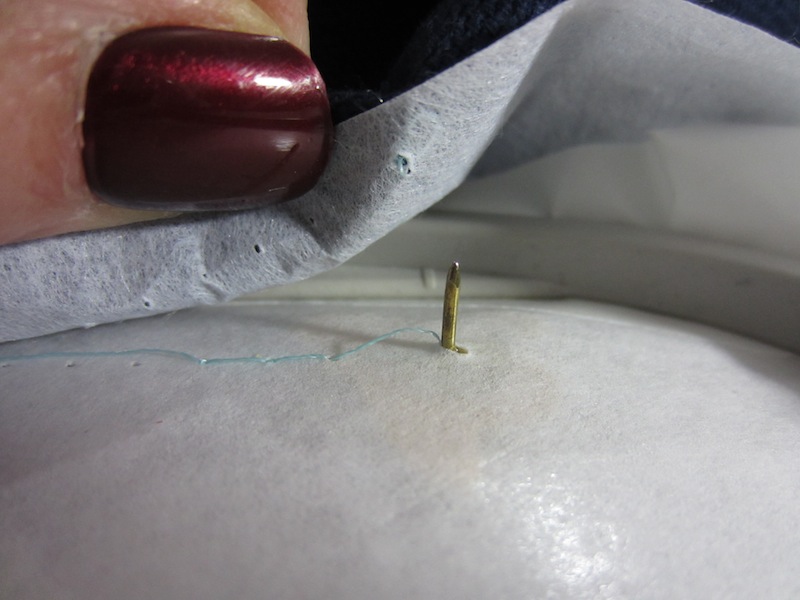

Take the line of stitching in the fabric and line it up with the line in the stabilizer. If you place two flathead thumbtacks into the stabilizer from the back of the hoop in the exact holes of the line……and put the exact holes in the fabric onto the thumbtacks, this is an easy way to match up the lines exactly.
Just remember to remove the thumbtacks and put them in a safe place before you go back to the machine!

Return the hoop to the machine and stitch out the rest of the design. How cool was that!

So there you have it! If you have to line up three hoops in a row, just repeat the software steps on inserting the alignment line between the sections. The line needs to stitch LAST in the fabric and FIRST in the stabilizer of the next hoop. Line up the lines and you’ll be lining up the designs.
Until next time – may your bobbins be full!
Lisa SewBubbles

Want to know more about
Embrilliance Essentials
and all it has to offer?
Click the image on the left to be taken to their website for program descriptions, videos, forums and more!