
How I create a cutting file of my Appliqué embroidery design for my Silhouette Cameo or Brother ScanNCut
Posted: June 8, 2014 Filed under: Education, Embrilliance Software, Embroidery Software, Uncategorized 12 CommentsI love that there is a way to cut fabric shapes for appliqué that is as simple as printing a document or pressing the copy button on a photocopying machine. Technology may be a bit frustrating at times to grasp, but once you do, man do the ideas of “what can I try next?” come flooding on in. So when I got my Cameo, I knew I had to find a way to create the shapes for my appliqué embroidery designs – the exact size so there would be no trimming at the machine.
 Now, I will tell you a secret….all these steps are going to be completely obsolete in a few weeks. But in the meantime, this is how I get a cutting file that matches my embroidery appliqué design.
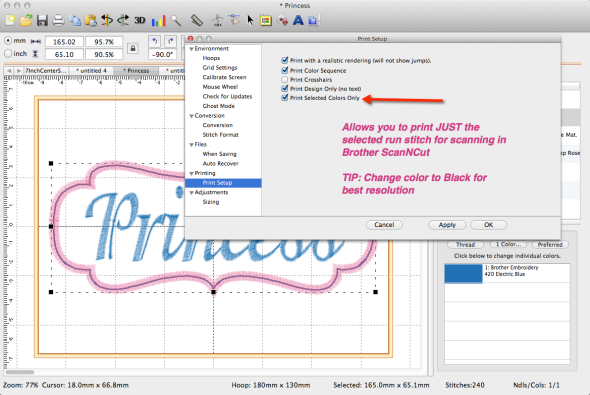 Here is the sample design open in my software – on the right I see the two design objects for the lettering and the frame. At the bottom right I see the color breaks in the design. I use Embrilliance Essentials and this program has a nice function of being able to print a selected color. For those with a Brother ScanNCut, all you need to do is make this choice in your printing preferences, select the color of the run stitch, print, scan and cut. BOOM how easy was that?!
I do suggest that you change the thread color before you print to something with high contrast. Black or Dark Blue or Brown for example will work quite nicely. You can always change it back if you need to 🙂
Since I also print actual size templates of my regular embroidery designs, I have gotten used to using the Print Preview when I am on my Windows computer – in case I forgot to uncheck this preference…. yup if you have nothing selected, nothing will print. Using print preview reminds me right away to either change the setting or simply go to Edit > Select All then print again. Always more than one solution to the problem at hand.
So that’s great for the ScanNCut, but how do I get something that my Cameo can use? Like I mentioned – there are many different ways to accomplish a task – this just happens to be my way. AND you’re going to keep an eye out on my blog, because in a few weeks I’m going to show you something that will make you flip! And for those on the fence for getting a cutting machine – it could be what says “Go For It!” but let’s get started with the steps.
First, I again go to the Preferences and this time choose Grid and set it for 1 inch (25.4mm). Be sure to apply and that the grid option is checked under the View menu. The one inch grid is going to help us make sure we create the correct size cutting file.
 Next, I expand the appliqué design so I see all of the object breaks and select the running stitch for the shape. It can be either the placement or the material – sometimes the material color will have a more detailed cut line so you will want to use that one. If the appliqué has a “hole” in it, like the letter A – the placement may just be the outside line of stitching but the material run will also have the hole stitched so you can trim it. So check to see which one is the best to use.
When I have this object selected, I check to make sure that I can see the line on screen. If I can see the line, I’m ready to take a screen capture of what I’m looking at. I use a program called SnagIt but there are many other programs out there. You can even use the SHIFT+PRT SCR command in Windows which is on every windows computer. If you do not have a screen capture program or don’t know how to take one, I recommend that you go to your favorite search engine and type in “how to I take a screen capture in Windows XYZ” where XYZ is the name of your operating system. This will be the best way for you to find the best way for your to do this.
 The next step is to open this graphic of the embroidery design into the Studio software. I have not upgraded to the newest version yet – not enough hours in the day! But what you want to do is change the size of the picture of the design by dragging the handles – and matching the 1 inch grid of the graphic with the 1 inch grid of the studio software. This is the key – the graphic must be the exact size in order to create the correct size cut file.
I can not simply type in the size because I don’t know what the size is. The “size” that you type into the Studio software is of the entire graphic, not the stitch line that I want to create. Using the grid was the simplest way that I have figured out to make sure that the picture of the embroidery design is the exact match so that the resulting cut file will work. Getting the right size is the most important part of the information I want to give you. I am in no way an expert in the Studio software! I just know enough to get the job done that I want to do without too much work.
 Since I am not using the current version of Cameo Studio, what you see may be a bit different. I use the freehand drawing tool to quickly click and make an outline that sort of looks like the shape I want. Creating the perfect shape on the first pass is never my intention. I use the node/point editing tool to reshape to create an exact match to the line of stitching. I always find it easier to edit something than to try and draw it perfect the first time.
If you are not familiar with how to use the Cameo Studio software, I would recommend you check out the tutorials on the Studio website.
http://www.silhouetteamerica.com/faq/solution/silhouette-studio-tutorials
If you are more of a visual person, I would check out their youtube channel: https://www.youtube.com/user/SilhouetteAmericaInc
Now one might ask why I don’t use the tracing function. When you bring in a low resolution image like a screen capture, you get a message about not getting a smooth cut file. Even if I brought in just the running stitch line – two problems exist. One, you have a grid that the software will try to “trace” as well. It doesn’t know you don’t want to cut the grid. So if you trace the design, you’ll have to go back in and delete. So using the grid technique to size the graphic to create the correct size doesn’t work well with the tracing function.
But like I said – there is always more than one way to get to the final result – you may find a better way! I just hope that the information presented helps those that haven’t tried using their Cameo to cut appliqué shapes! Have fun!
And don’t forget to follow my blog to get the exciting news I’ve been hinting about 🙂 Seriously – its gonna be wicked cool and you don’t want to miss out on news!
Until next time – may your bobbins be full!

Click Here for information on all of the affordable easy to use Embrilliance products!


You may be able to use the trace by using the tools on the trace menu. You can pretty much control what area will trace. The tools on the trace menu are awesome and can really be an asset to avoiding some of the image. You may have already tried this but after I found out how they were used, it made a world of difference.
Yes, the trace could work but I found that there was a lot of editing and I could click and reshape so much faster 🙂 And of course as I mentioned, this wasn’t a lesson on how to use Studio but rather how to ensure what you create in Studio matches the embroidery file. Plus, I know there’s a simpler solution on the horizon…. I feel like the woman in that store commercial with her “Open Open Open” chant because she couldn’t wait for the store to open!
Lisa, is the simpler solution coming from Embrilliance, the Silhouette Cameo, or the Brother ScanNCut? I’ve been considering adding one of the cutters, but if something is about to change I’ll wait, thanks!
Its actually going to work with either machine. You will be able to save the cutting file for the shapes of the embroidery design right from the program to either native format. For the SNC you could save the file right to a USB to put in the machine. For the Cameo, I just open the file into Studio just like any other cut file. Super duper simple. I’m testing it now with both machines and really enjoying this function. We will have news soon!
Awesome thank you!
Any update on this “simpler solution” yet? 🙂
I just posted a new blog post about it!
Thank you!
Hi Lisa, Last Christmas I received the Silhouette Cameo. This Christmas I received my first sewing machine EVER (Brother SE400), which happens to include embroidery. Knowing nothing of sewing/embroidery, I assumed I’d be able to design something on my MacBook Air and tell the machine to make it. (After all, that’s pretty much how the Silhouette works). Sadly, it seems I’m limited to the SE400’s built-in options and downloads… no designing on a Mac without VERY expensive software. Which got me to thinking…. is there anything a Silhouette can’t do?! Maybe it could help with this dilemma….? Do you think I could design something using the Silhouette software that will tell the SE400 what to stitch? Any guidance greatly appreciated! Happy Holidays!
Happy Holidays! The Silhouette Cameo is an electronic cutting machine and the SE-400 is an embroidery/sewing machine. These two are companion products but they do not speak the same language. Kind of like the food processor and the oven – they are both kitchen appliances with their own jobs. If you want to create your own embroidery designs from scratch, you would need digitizing software. I use Embrilliance StitchArtist on my Mac and Windows computers – works on both. It will allow me to create an applique design and I can then save the applique shapes as Studio cut files to send to the Cameo electronic cutter using that software.
StitchArtist is to create new designs from scratch. If you want to customize existing embroidery designs (including saving cut files for applique embroidery designs such as the monogram letters shown in a later blog post), I use Embrilliance Essentials.
The entire Embrilliance software line works on either the Mac or windows computers and I believe is well priced for the quality of the features and functions you get. Here is a link to the StitchArtist information and you can also check out Essentials while you are there. http://www.tinyurl.com/StitchArtist If you have further questions about their programs, use the contact us link on their website – they answer every single ticket submitted and you can even create a login to access your ticket and their response from any device any location. ENJOY!
Hi there- I was wondering if you can help me do the reverse. You have an applique shape already….you want to make your cut file into an embroidery applique file to match your custom shape. How is the easiest way to maintain your size? Please help. Thanks, ScrapMom
Hello – you need digitizing software in order to create stitches. I use Embrilliance StitchArtist Level 2 to open SVG files and create appliqué designs. If you don’t have digitizing software and StitchArtist looks like something you might be interested in, please use this link to get more information on the product. StitchArtist Because I teach the software, I sometimes have a promocode which will give you a discount if you purchase using my link. Send me an email if you are ready to purchase and want to see if I have a coupon for you!